#Disabling UAC
Explore tagged Tumblr posts
Visit Tumblr Blog
Explore Tumblr blogs with no restrictions, modern design and the best experience.
Last Seen Tumblr Blogs


Fun Fact
Mobile Tumblr US users spend an average of 4.04 minutes per session on the app.
Text
Invalid Credentials "Fix Failed to Connect a Hyper-V Standalone to Veeam Backup"

View On WordPress
#Adding Server 2019/Hyper-V 202022/HyperV2025 to Veeam Fails#Disabling UAC#Fix Failed to Connect a Hyper-V Standalone to Veeam Backup#Hyper V#Hyper-V#hyperV#Hypervisor#Microsoft Windows#Network path not found#Type 1 Hypervisor#Unable to connect to VBR#VBR#Veeam#Veeam Backup and Replication#Veeam Data Platform#Windows#Windows Server#Windows Server 2016#Windows Server 2019#Windows Server 2022
0 notes
Text
Alright. I'm making this post because I was unpleasantly surprised to find Microsoft had forcibly downloaded an """"ai assistant"""" onto my computer (called Copilot), and because finding a site that actually told me how to kill it for good -- in clear, truly step-by-step terms -- was way harder than it needed to be.
Preface: this is only relevant if you're running Windows 11.
Here is your target:

If you see this logo on your taskbar -- or... have Edge installed on Windows 11 -- you've got Copilot. You can't delete it on its own, Microsoft has integrated it into the OS as best they can. The most you can do is disable it (instructions for which are at the very end of this post).
So... to REALLY get rid of it you need to uninstall Microsoft Edge, because it's a part of/reliant on Edge. A lot of bells and whistles of Windows are also reliant on Edge, like widgets, but I never use those. I use my PC almost exclusively for gaming, and I don't want this slimy "ai" shit on my computer. I use Firefox anyway. Edge can go die as far as I'm concerned.
Here's the actual steps, copy-pasted from a website that took me way too long to find. It also really makes my browser chug for some reason, which is why I'm copy-pasting the whole thing. If you still want to look at the site itself, put it in reader view as fast as you can (link to site).
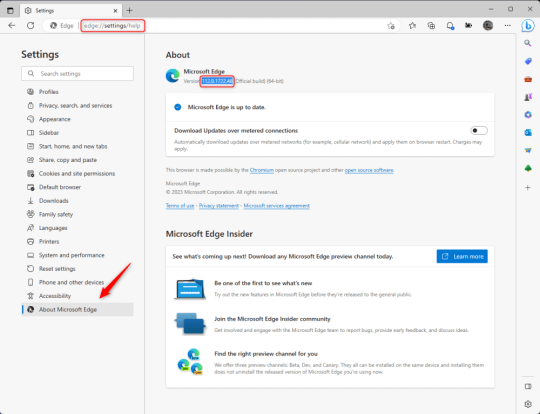
1.) Open Microsoft Edge, type "edge://settings/help" in the address bar, and then press Enter.
2.) Click "About Microsoft Edge" at the bottom of the left-hand pane. Copy the version number at the top of the screen, under Microsoft Edge.
3.) Press Windows Key + S to open Windows Search.
4.) Type "Command Prompt", right-click the result, and then select "Run as Administrator".
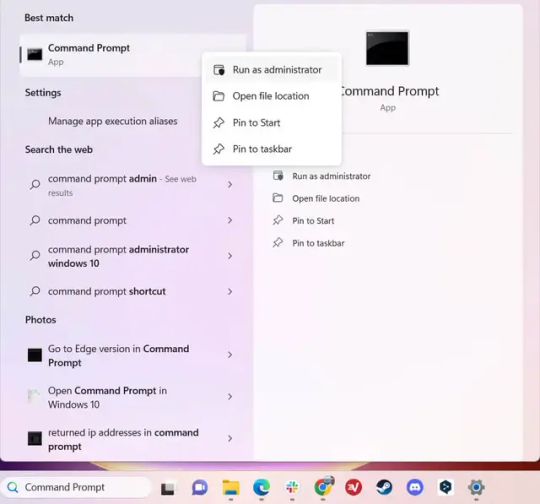
5.) The User Account Control (UAC) prompt will appear. Click "Yes".
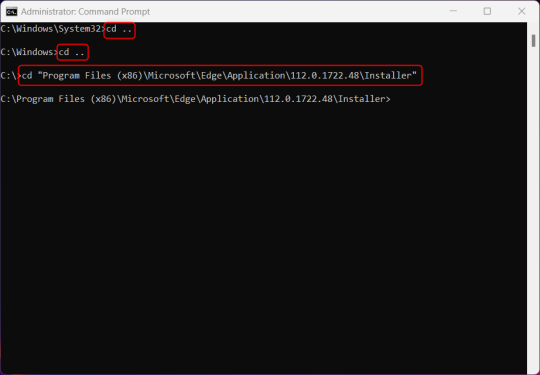
6.) Navigate to Edge’s “Installer” directory by using the cd command. Depending on which directory your Command Prompt opens in by default, you may need to use the "cd .." command to go back a level or two.
Once ready, run this command:
cd “Program Files (x86)\Microsoft\Edge\Application\Version Number\Installer”
Replace "Version Number" with your actual version number copied earlier.
7.) Next, run this command to uninstall Microsoft Edge:
setup –uninstall –force-uninstall –system-level
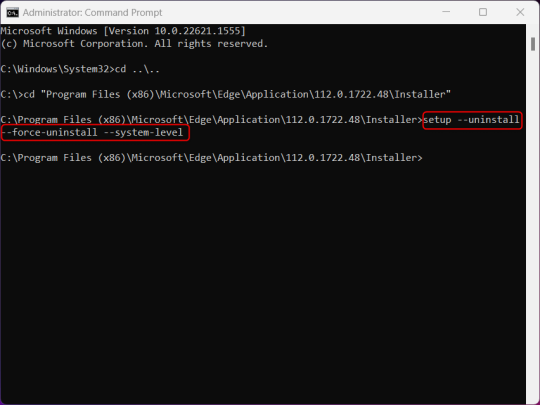
((It will look like nothing happened! Don't worry!))
8.) Restart your PC for the changes to take place.
((HOWEVER, Windows will try to reinstall it the next time your PC updates (or whenever it feels like it lol) so there's a second half to this))
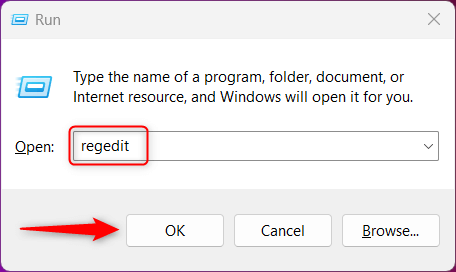
1.) Press Windows Key + R to open Run.
2.) Type "regedit" in the text box and click OK to open the Registry Editor.
3.) The User Account Control (UAC) prompt will appear. Click "Yes".
4.) In the Registry Editor, navigate to HKEY_LOCAL_MACHINES\SOFTWARE\Microsoft.
5.) Right-click the "Microsoft" folder, hover your cursor over "New", and then select "Key".
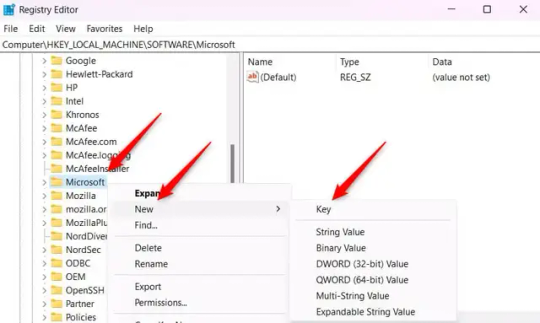
6.) Rename the new Key to "EdgeUpdate".
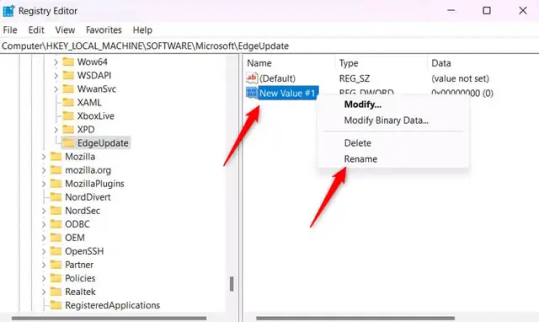
7.) Right-click EdgeUpdate, hover your cursor over "New", and then select "DWORD (32-bit) Value".

8.) Right-click the new value, which is currently named "New Value #1".
9.) Select "Rename" from the context menu.
10.) Rename the value to "DoNotUpdateToEdgeWithChromium".
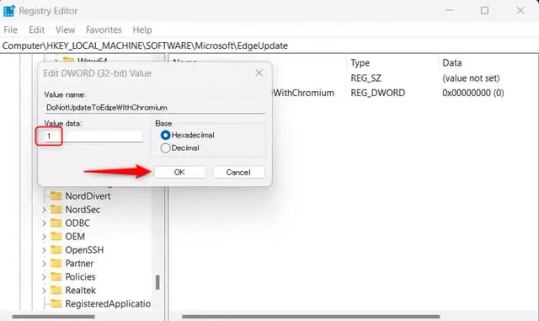
11.) Right-click the newly-named DoNotUpdateToEdgeWithChromium value and select "Modify" from the context menu.
12.) The Edit DWORD (32-bit) Value window will appear. Change the Value data to "1" and then click OK.
((You are now free. If you ever run into a really serious, unavoidable issue with your OS that's clearly a result of Edge being gone, you can redownload it like a regular app. But you should be fine.))
((And, if for some reason you want still want Edge around but just want the copilot thing gone, here's what you do:
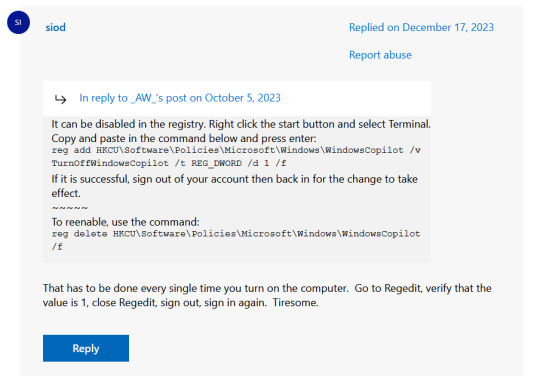
The command, for ease of copy-pasting: reg add HKCU\Software\Policies\Microsoft\Windows\WindowsCopilot /v TurnOffWindowsCopilot /t REG_DWORD /d 1 /f
You can't actually truly delete Copilot (without deleting Edge), only disable it. And as the reply says, you do have to do this every time you turn the computer on. I haven't tested that myself, but I believe it. I assume/hope that excludes just waking the computer up after it goes to sleep, but I don't know for sure.))
120 notes
·
View notes
Text
TS4 CC not working despite installing correctly? Make sure Windows unblocked the file!
I've seen this a lot on some CC creators Patreons, where the person can't seem to get the CC working despite installing it correctly. If you're using Windows 10 or 11, it could be that Windows is blocking your downloads.
This is a security feature by Windows and AFAIK, you can't disable it but you can fix your downloads (including things you've already installed!). Though this is tedious, you only have to do this once per folder.
If you have CC that's in a zip/rar/compressed file, you can just do the first few steps on the zip/rar/compressed file and it was unblock everything within the zip file but ONLY if that file has the "unblock" notification seen in my screenshots.
You can't make things faster by tossing all of your CC into a zip/rar/compressed file and then unblocking it - you would have to use the Powershell command that's in part two of this.
A quick note: I'm using Windows 10 and a custom theme with custom-made cursors as well as custom-made taskbar and desktop icons, so my UI might look different than yours.
Read on, I have you covered in this super short tutorial.
PART ONE: UNBLOCKING SINGLE FILES.
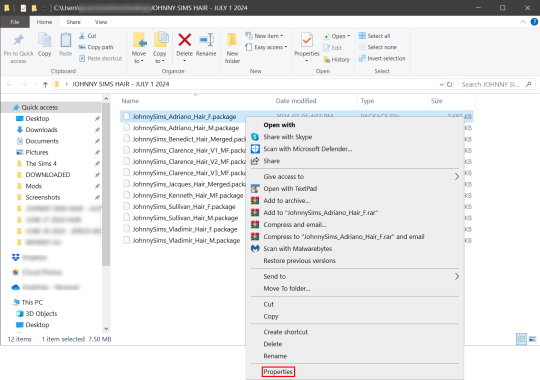
When I download CC, I put my .package files into a folder on my desktop and name it Creator Name - Date, so that if I'm having trouble with my game being weird, I can do back and see what I last installed by looking for the date in the folder name. After I know this CC won't cause trouble, I'll just remove the date sometimes but usually I just leave it.
For this tutorial, we're going to assume your CC is in a folder like mine:

So, you can see I have a few Johnny Sims hair I've downloaded today. It's ready to go into my CC folder but first I need to 'unblock' it. Let's right-click the first file, "JohnnySims_Adriano_Hair_F.package" and left-click "properties".
Now you're going to have a new window come up with a message:
This file came from another computer and might be blocked to help protect this computer.
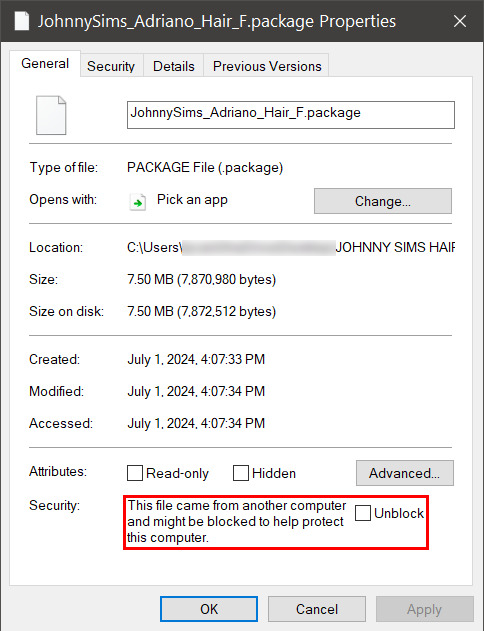
Click the checkbox (the square) next to the word Unblock that is to the right of the message, and then click "apply" and "okay". This window will now close. Do this for each of your .package files.
That's it! You're done and can now move your CC into your mods folder. You will have to do this each time you download new CC as Windows has this security feature on by default and it's not a good idea to disable it unless you really know what you are doing. It protects your computer from allowing harmful malware to run.
There is a command to use to unblock an entire folder in one go if you're wanting a quick means to do this, so read on for that.
PART TWO: UNBLOCKING AN ENTIRE FOLDER WITH WINDOWS POWERSHELL
If you want to unblock an entire CC folder, the easiest way is with a Windows PowerShell command. This requires you to be on an administrator account on your Windows machine, otherwise you will have to enter the administrator password or have some other means to bypass UAC.
I would recommend making a backup/copy of your mods folder and making a backup before doing this, as well, moving your mods folder to your desktop and executing this command there, rather than doing so within the Sims 4 folder.
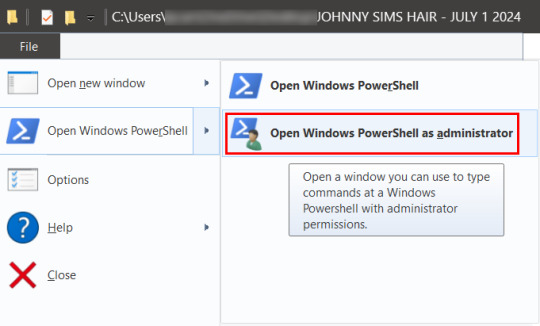
You'll want to click "file" up on the top left of your CC folder, then hover over "Open Windows PowerShell":
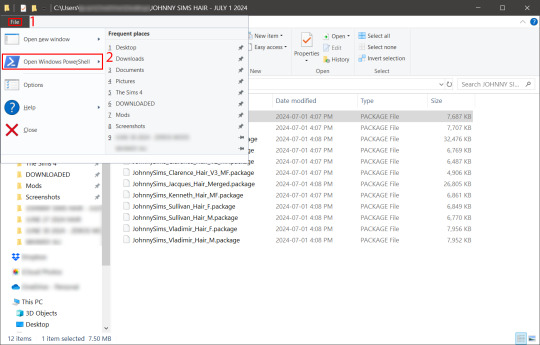
From there, a second menu should come out that gives two options: "Open Windows PowerShell" and "Open Windows PowerShell as administrator".
We want to click "Open Windows PowerShell as administrator":
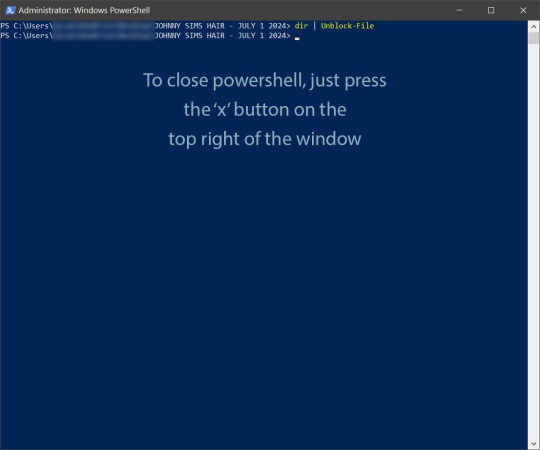
You'll have a command prompt-looking window pop up then. Mine is blue, yours may be a different color depending on if you have a different Windows theme or dark mode enabled (I do not have dark mode).
With this window open, you'll see that the directory listed is the one for your CC folder we were just in. Click at the end of the directory where the > is, and type: dir | Unblock-File (capitalization is important here, and for QWERTY keyboards, the | button is above the 'enter' key, you just have to use the 'shift' key while pressing it, otherwise you'll get a backslash):

Now hit 'enter'. You won't get any sort of message telling you the command has worked. If you get an error message, you typed something wrong. Just type correctly on the next line and hit 'enter' again.
If your user directory shows up like mine with a flashing cursor, that means Windows PowerShell is waiting for another command and you did it correctly. Close out of this window by clicking the 'x' on the top right of the window.
Check your CC by right-clicking any of the .package files as we did at the start, going to 'properties' and then making sure that message is gone:

See how it is blank under 'attributes'? The message is gone, meaning our CC is unblocked. Now we can move it into our mods folder and it should show up in the game.
If you have any questions, feel free to send me a message/ask and I'll do my best to help!
2 notes
·
View notes
Text
How to Disable Copilot on Windows 11
Windows Copilot, Microsoft's new AI assistant, can assist you with a variety of tasks, such as answering questions, changing system settings, and creating AI images. However, if you're not a fan of Copilot or simply don't need it, you can remove its taskbar icon or disable it entirely on your Windows 11 PC. Here, we'll show you how.
How to Remove the Copilot Icon From the Windows 11 Taskbar
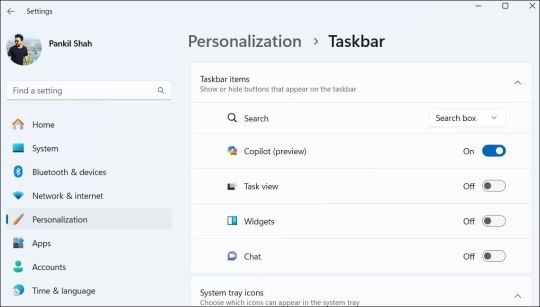
By default, the Copilot icon appears in the Windows 11 taskbar. However, if you prefer not to have it there but still want to use it occasionally, it's easy to hide the Copilot icon. Simply right-click anywhere on an empty spot on your taskbar and select Taskbar settings. In the Settings window that appears, turn off the toggle next to Copilot.
This should remove the Copilot icon from the taskbar. You can still access Copilot by pressing the Win + C keyboard shortcut in Windows 11.
How to Completely Disable Copilot via Group Policy Settings
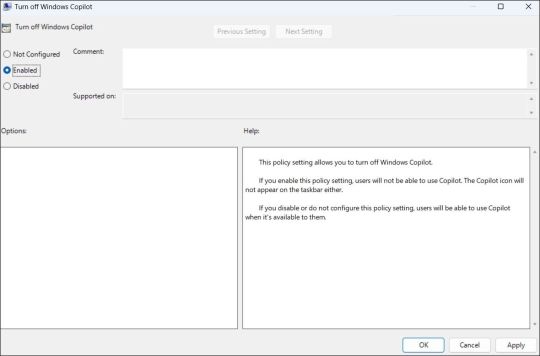
Although hiding the Copilot is quite easy, it does not turn it off completely, and you might inadvertently access it. Fortunately, you can turn off Copilot completely via the Local Group Policy Editor on PCs running the Professional, Education, or Enterprise edition of Windows 11. - Press Win + S to access the search menu. - Type gpedit.msc in the search box and select the first result that appears. - Select Yes when the User Account Control (UAC) prompt appears. - Use the left pane to navigate to User Configuration > Administrative Templates > Windows Components > Windows Copilot. - Double-click the Turn off Windows Copilot policy on your right. - Select the Enabled option. - Hit Apply followed by OK.
Once you complete the above steps, Copilot will be disabled on your Windows 11 PC and you won't be able to access it even with the keyboard shortcut. If you want to re-enable Copilot later, repeat the above steps and set the Turn off Windows Copilot policy to Not configured or Disabled.
How to Completely Disable Copilot by Modifying Registry Files
Another way to disable Copilot on Windows 11 involves modifying registry files. However, since editing the registry can be risky, you should follow the steps carefully. Also, be sure to back up all the registry files or create a restore point. This will allow you to restore the registry files in case something goes wrong. Once you’ve done that, here’s what you need to do to disable Copilot via the Registry Editor: - Press Win + R to open the Run dialog. - Type regedit in the text box and press Enter to open the Registry Editor. - Select Yes when the User Account Control (UAC) prompt appears. - Use the left pane to navigate to HKEY_CURRENT_USER > Software > Policies > Microsoft > Windows. - Right-click the Windows key and select New > Key. Name it WindowsCopilot. - Right-click on the WindowsCopilot DWORD, go to New, and select DWORD (32-bit) Value from the submenu. Name the DWORD TurnOffWindowsCopilot. - Double-click the TurnOffWindowsCopilot DWORD, type 1 in the text field, and click OK. - Restart your PC for the changes to take effect.
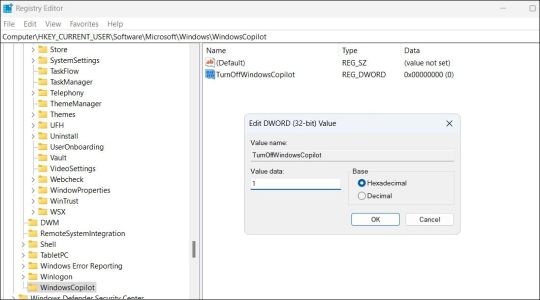
And that’s about it. Windows Copilot will be disabled on your PC. To re-enable it in the future, repeat the above steps and set the TurnOffWindowsCopilot DWORD value to 0. You can also delete the TurnOffWindowsCopilot DWORD instead.
Get Rid of Copilot on Windows 11
While Windows Copilot is a powerful tool, not everyone may want to use it. Fortunately, it’s possible to get rid of it. The above steps will help you achieve your goal, whether you want to keep Copilot out of sight or turn it off entirely. source Read the full article
3 notes
·
View notes
Text
IObit Uninstaller 13.6 Pro Key License [1Yr Free 2024]
What is IObit Uninstaller 13.6 Pro Key?
The IObit Uninstaller 13.6 Pro key is a license key that unlocks the full capabilities of IObit Uninstaller 13.6 Pro. This key grants access to advanced features and tools designed to help you efficiently manage and remove unwanted software from your computer. Unlike the free version, the Pro version offers enhanced functionalities for a more comprehensive cleaning experience.
What is IObit Uninstaller 13.5 Pro Key?
The IObit Uninstaller 13.5 Pro key serves a similar purpose for the previous version, IObit Uninstaller 13.5. It provides access to Pro features in that version, allowing for advanced uninstalling capabilities and better system optimization compared to the free version.
Features of IObit Uninstaller 13.6 Pro Key
Advanced Uninstallation: Completely removes unwanted software, including residual files and registry entries.
Browser Toolbar Removal: Easily eliminates unwanted browser toolbars and plugins.
Real-Time Monitoring: Monitors installations in real-time to ensure complete removal.
Powerful Scanning: Performs a deep scan to clean up leftover files and registry traces.
Batch Uninstall: Allows multiple programs to be uninstalled simultaneously.
How to Activate IObit Uninstaller 13.6 Pro Key with License Keys?
Download and Install: First, download and install IObit Uninstaller 13.6 from the official website.
Launch the Software: Open IObit Uninstaller 13.6 Pro on your computer.
Enter License Key: Navigate to the registration or activation section within the software.
Input Key: Enter your IObit Uninstaller 13.6 Pro key in the provided field.
Activate: Click the activation button to unlock Pro features.
How to Uninstall IObit Uninstaller?
Open IObit Uninstaller: Launch the application from your applications or start menu.
Select Program: Choose IObit Uninstaller from the list of installed programs.
Uninstall: Click the uninstall button and follow the prompts to remove it from your system.
Clean Residual Files: Use any built-in cleanup tools to ensure all associated files are deleted.
IObit Uninstall and Remove Administrator Issues on Windows 10
If you encounter administrator issues while uninstalling IObit Uninstaller on Windows 10:
Run as Administrator: Right-click the IObit Uninstaller icon and select “Run as administrator.”
Disable UAC: Temporarily disable User Account Control (UAC) if you continue to face issues.
Use Safe Mode: Boot your computer in Safe Mode and try uninstalling the program again.
Use an Uninstaller Tool: Consider using another uninstaller tool if the built-in method fails.
Why Choose IObit Uninstaller 13.6 Pro Key?
1. Comprehensive Removal: Provides thorough uninstallation to eliminate all traces of unwanted programs.
2. Enhanced Performance: Improves system performance by removing clutter and optimizing the registry.
3. User-Friendly: Offers an intuitive interface for easy navigation and operation.
4. Real-Time Monitoring: Ensures clean installations and removals with real-time monitoring.
IObit Uninstaller 13.6 Pro Key Free License 2024
6E25C-21F89–7F62B-D86BC for 13.6.0.5– Valid till — October 16, 2024.
Free License: 11242-C437D-DE013–6E6TC
New License: DB978–6E333-B12DC-7BDTC
Key: F6741-F743C-7CE93–3C8TC (Valid till June 20, 2024)
30C81–393A2–7DBAF-390TC — Valid till — November 8, 2024
6E25C-21F89–7F62B-D86BC — Valid till — October 16, 2024
F6741-F743C-7CE93–3C8TC — Expiry: June 20, 2024
11242-C437D-DE013–6E6TC — Expiry: May 30, 2024
DB978–6E333-B12DC-7BDTC
11242-C437D-DE013–6E6TC
BE75C-BD2C8–7E065–3FEBC (Valid till Apr 08, 2024)
5E635-B9223-D6779-BAEBC (Valid till Mar 22, 2024)
539C6-A60A4–62290–383TC (Valid till Mar 02, 2024)
6B95D-3EE8D-ED01B-2DDTC (Valid till Mar 02, 2024)
4AEC4-DAE7D-A0C86–765TC (Valid till Mar 02, 2024)
B894E-7ADF2–100F1-CC1TC (Valid till Mar 02, 2024)
539C6-A60A4–62290–383TC (Valid till Mar 02, 2024)
7B48B-01241–1EE02–3BETC (Valid till Feb 18, 2024)
7A54B-0A8ED-8F770–4ECTC (Valid till Feb 09, 2024)
2CBB7–715F7–9E5BE-991TC (Valid till Feb 09, 2024)
IObit Uninstaller 13 ProLicense Key (3 Device)
CDNJF-P6G3P-85BQV-58Y7E
4MM6R-R9332–4JKKJ-X3N46
Q9DHY-5367H-YYVLN-JGW5U
M3JFE-7MNWQ-MM59G-K5WXY
QKSUD-GEZRM-JVNER-K2EGP
Z3XSZ-6PVNJ-YNN8J-ZRPRX
IObit Uninstaller Pro Activation codes (6 Months)
B894E-7ADF2–100F1-CC1TC
81B57-E0F9E-14836–570BC
C7870-A6BBE-D9C12-A25TC
CE697–12E0B-46B82-AE4TC
FE17F-ADE45–6BED8–30DTC
879BF-5A984–8EEB0–86ETC
4BCDA-6B1CC-3AC6F-AD4TC
Conclusion
IObit Uninstaller 13.6 Pro Key is a powerful tool designed to help you manage and remove unwanted software effectively. With advanced features like real-time monitoring and deep scanning, it ensures a thorough cleaning process. To activate the Pro version, simply use the provided license key, and for any issues, follow the suggested solutions to uninstall or troubleshoot.
0 notes
Text

Before downloading and installing the Pro Contractor Studio software, we recommend that you temporarily disable the Windows User Account Control (UAC).
0 notes
Text
User Acceptance Testing Tools and Checklist
User Acceptance Testing (UAT) is a critical phase in the software development process where end-users evaluate the software to ensure it meets their requirements and works as expected. To effectively conduct UAT, you can use various tools and checklists. Here's a list of both:
User Acceptance Testing Tools:
Test Management Tools: These tools help in creating and managing test cases, test scripts, and test execution. Some popular options include TestRail, Zephyr, and TestLink.
Collaboration Tools: Use tools like Slack, Microsoft Teams, or Trello for communication, collaboration, and issue tracking during UAT.
Bug Tracking Tools: Tools like JIRA, Bugzilla, or Mantis can help in reporting and tracking issues or defects found during UAT.
Screen Recording and Capture Tools: These tools can be helpful for capturing and sharing issues or discrepancies. Software like Snagit or ShareX can be useful.
Automation Testing Tools: Depending on the complexity of the application, you may use automation testing tools like Selenium, Appium, or TestComplete to automate repetitive test cases.
Feedback Collection Tools: Tools like Google Forms or SurveyMonkey can help gather user feedback and preferences.
Version Control Systems: Tools like Git can be useful for tracking changes in the application and managing different versions.
Issue Collaboration Tools: Collaborative tools like GitHub or GitLab can be used for issue tracking and code collaboration during UAT for software development.
User Acceptance Testing Checklist:
A UAT checklist helps ensure that the testing process is comprehensive and covers all essential aspects of the application. Here's a basic checklist to get you started:
Requirements Validation:
Verify that the software meets the defined user requirements.
Functional Testing:
Test core functions and features.
Ensure that data input and output are accurate.
Usability Testing:
Assess the software's ease of use.
Evaluate the user interface for clarity and user-friendliness.
Compatibility Testing:
Test the software on different devices, browsers, and platforms to ensure compatibility.
Performance Testing:
Verify that the software performs well under different conditions, including load and stress testing.
Security Testing:
Ensure that the software is secure and doesn't expose sensitive data.
Integration Testing:
Test how the software interacts with external systems and components.
Data Validation:
Check data accuracy, integrity, and validation rules.
Regression Testing:
Ensure that new changes or bug fixes do not introduce new issues.
User Acceptance Criteria (UAC):
Verify that the software meets the agreed-upon UAC.
Documentation Validation:
Review user manuals and help documentation.
Performance Metrics:
Check that the software meets defined performance metrics, e.g., response times, page load times.
Accessibility Testing:
Ensure the software is accessible to users with disabilities.
Security Compliance:
Ensure that the software complies with security standards and regulations.
Data Backup and Recovery Testing:
Test backup and recovery procedures in case of data loss or system failure.
User Feedback:
Collect feedback from users and stakeholders for further improvements.
Sign-off:
Obtain formal approval from users or stakeholders to release the software.
The specific checklist items will vary based on your project's requirements, but this checklist covers many common aspects of UAT. Adjust it to match your specific needs.
0 notes
Text
What Is UAC in Windows 10 and How to Disable It ?
What Is UAC in Windows 10 and How to Disable It ?

What Is UAC in Windows 10 and How to Disable It?
If you have a network of computers in your home or workplace, you need to control which users or applications can change something on that system.
One way to prevent unauthorized changesis to designate one person as the network administrator. However, having one person managing everything is not enough, and this is where User Access Control (UAC)…
View On WordPress
#How to Add a Family Member to Your Microsoft Account#How to Disable UAC in Windows 10#Take Control of Your Accounts#What Is UAC in Windows 10 and How to Disable It
0 notes
Photo


PAO1&2.pk3: Phobos Abandoned Outpost (pt1 + pt2) MAP02: Phobos Abandoned Outpost (pt2) (840, 5259, -56) Author: Peter Moro Date: 2020-07-04 Description: Story: "You are an ex-marine mercenary called in to investigate an abandoned UAC facility on Phobos." This is a compilation wad of Part 1 and Part 2, designed to be sequential. Part 1 has been updated and improved a little since last year's release (March 2019). Pt.2 is a very long level so be sure to save often! Although it's a long game, there is plenty of gameplay and layout contrast and variation. I like long maps. Layout is not confusing and it's likely you won't need to consult the computer map. Gameplay is fast paced but not slaughter but almost slaughterish at times. Mostly linear gameplay but plenty of exploration and multiple paths. Many secrets, none of them too difficult to find in the first playthrough. I don't consider this map to be difficult. There is plenty of health and ammo scattered around. Challenging at times, but possible to complete without dying on the first attempt. I hate frustrating maps that are too difficult and unfair and i strive to make my maps more fun and atmospheric than challenging. There is a huge outdoor area which may slow down your framerate if your PC isn't awesome. In that case, please consider lowering your settings and disabling things like bloom, anti-aliasing, ambient occlusion, etc. My HP laptop does ok.....just. Estimated completion time: Part 1....45-60mins, Part 2.....60-90mins. Requirements: Jumping and crouching are disabled but Freelook is permitted. Textures: All found on the Afterglow website: Grasstex, Jimmytex, Koultex, NBflats, NB_Recol, nb_Silv, Ultratex, wallytex. Thanx to all the cool dudes who made those great textures. Hope you enjoy it!
7 notes
·
View notes
Text
Game Instalation Guide:installing the sims castaway stories on your machine
Introduction
Hello! I’m Luca and welcome (back) to my tumblr! Recently i became addicted to the sims castaway stories so i decided that today i’m gonna show you how to install The Sims Castaway Stories on your machine! (and also make it to work)
DISCLAMER
i think we all know what is this game! So i won’t talk about it today! lil’ disclamer:The Sims Castaway Stories’s pc version is laptop frendly so it can run well on laptops but of course it has problems running on modern systems! However we will make the game to work on windows 10 so don’t worry!
BEGINNING
Before we begin please disable your antivirus! And you will also need a tool for extracting .zip or .rar files! You can get Winrar or 7-Zip,it dosen’t matter that much! Tho i recommend using 7-Zip because it’s free :D
1.Go to https://oldgamesdownload.com/the-sims-castaway-stories/ and go to the download the sims castaway stories then select the purple button,Should look like below:

2.After that,select how would you like to download castaway stories! You have to options: mega.org or archive.org,it dosen’t matter which one you select.

3.(7-ZIP USERS) After it finished downloading select the archive and right-click on it and then select open with,scroll down to the bottom and select look on another app on this pc then go to C:\Program Files\7-zip then select 7zFM.exe ,for 32 bit systems it should be the same default location or Program Files (x86)
(WinRAR USERS) You can do the same process but select the default location for winrar UNLESS it’s already set as default.
4.Continuing,after that open the archive then select its content and paste it into a new folder.
5.After it finished the extracting procces make sure your antivirus is disabled because if it is enabled the crack is going to be detected as a virus and will get removed,then add the folder with the game’s setup to the exceptions list (just to be safe <3)
6.Open the setup and if you get a pop-up from UAC(user account control) saying:an admin has blocked you from running this app, follow this tutorial: https://www.youtube.com/watch?v=1jgwD2e1MB8&ab_channel=TreeAcademy
7.Open the setup again and follow the on-screen instructions,when a serial code is required use this: N78Q-RZKW-7428-DB09-DVTY then select the directory you want to install the game then let the installer do its job,after it got finished select quit then finish.
8. You can enable UAC again now,also add the game’s installation directory to your exceptions,For Windows Defender go to Virus&treat protection > Virus&Treat Protection settings then select manage settings then scrol down to add or remove exclusions and then select the game’s folder,the default is C:\Program Files or Program Files(86)\EA Games\The Sims Castaway Stories
9.Go to the crack folder then select the files inside them and copy them to the game’s folder mentioned above then go into the tsbin folder and right click and select paste. CONGRATS! THE GAME IS FULLY INSTALLED BUT WE AIN’T FINISHED YET!
Optimizing the game!
1. We will need GRM (graphic rule maker) and ONLY IF YOU HAVE 8 GB OF RAM OR MORE we will use 4 gb patch. Download GRM here and 4 gb patch here
2.I’m gonna assume that you know how to install GRM and continue.After the tool got installed open it and it should look like this:
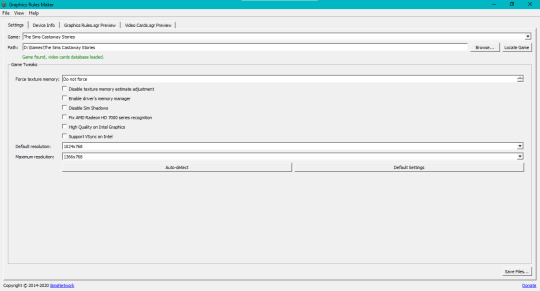
3.Select the game from the game list and then select the locate game button and if it dosen’t detect it select browse.. and select the game’s location.
4.Based on your GPU you need to force the texture memory or the game won t work,go to the search button (for windows 10) and search advanced display info and then scroll down and select Display Advanced Proprieties for Display 1 or 2,a window should open and you need to look at the dedicated video memory and the amount of vram that you see there is the amount that you will enter in the force texture memory section.
5.Select the disable sim shadows option and if you have an amd gpu select the fix amd radeon hd series option,then select your resolutions then save the files,select yes and then ok and you are done!
6.Open the 4gb patch and select the SimsCS.exe file from the tsbin sub-folder of the game’s directory.
Now you are done optimizing the game! You can right click on the SimsCS.exe and select send to desktop(create shortcut)
The game should work now,if you have any questions please ask them in the ask me anything section! Enjoy!
20 notes
·
View notes
Text
Windows 7 Ultimate Nvidia Edition

BSOD Windows 7 Ultimate Edition (bootcamped on imac) - PLEASE HELP in Hardware & Devices I've recently installed Windows 7 Ultimate Edition onto my imac using bootcamp last week, and it has been working perfectly fine, and then randomly starting today I get a BSOD less then 5 minutes after being logged into the windows side. And i don't have. Windows 7 Starter, Home Basic, and Home Premium will recognize only one physical processor. Prior versions of Windows, including Windows 7 and Windows 8.1, have limited support when running on new processors and chipsets from manufacturers like Intel, AMD, NVidia, and Qualcomm. For more information, please see the Support Lifecycle FAQ. Visit the link below, choose the Type as Windows (Final), version as Windows 7 SP1 (build 7601), edition as per your needs (Home Premium, Professional, Ultimate), language, and finally the x64.
Windows 7 Ultimate Nvidia Edition Iso
Windows 7 Ultimate Nvidia Edition Price
Windows 7 Ultimate Nvidia Edition 64 Bit Download
Saturday, Aug 07 2021 12:25PM. Version: V 2.1.1.5. Dragon Age Origins – Ultimate Edition Free Download Repacklab Dragon Age Origins – Ultimate Edition Free Download You are a Grey Warden, one of the last of this legendary order of guardians. With the return of mankind’s ancient foe and the kingdom engulfed in civil war, you have been.
Seperti kita ketahui NVIDIA Corporation adalah salah satu perusahaan pembuat kartu grafis terbesar di dunia. Kali ini saya akan share tentang Windows 7 NVIDIA Edition, sebenarnya os ini adalah os hasil edit dari Windows 7. Jika anda menggunakan os ini mata anda akan takjub dengan grafis yang keren dari os ini. Ditambah lagi anda tidak perlu melakukan aktivasi karena os ini sudah teraktivasi secara permanen. Berikut adalah preview dari Windows 7 NVIDIA Edition :
Windows 7 Ultimate Nvidia Edition Iso
Screenshoot :
New Windows Sounds
New High quality icons
NVIDIA Tweaker from Rockers Team
Improved Texture quality for NVIDIA cards
More clear picture quality than normal view
Reduced Gaming crashes
Disabled Apply Colors At Startup
Consume low power
All the latest updates are patched Manually.
Resolved a Windows 7 Media Center issue for systems configured for ISDB broadcasts.
Supports all future updates and packages
Resolved some reliability issues in Windows 7
Resolved compatibility issues
Adobe Flash Player plug-in
Black and blue Background Shells
Codings and scripts are updated for Gaming level (This option is available only in Rockers Team Customized windows
and not available in any other customized OS)
More Stable and Reliable
UAC Disabled
Large Icons Control panel
New Look for Windows Media Player
New Shortcut Arrows
Show extensions for known file types
Enabled IE Phishing Filter
User Account 2 on Control Panel
Low Memory consumption
Enabled Glass Effect without a supported card
Windows will tell you exactly what it is doing when it is shutting down or is booting
Added command prompt to right click context menu
Enabled addition Avalon effects
Disabled Tool Tips
Enabled ClearType Tuning
Added ‘Copy to Folder’ , ‘Move to Folder’ , ‘Open with Notepad’ to right click context
Disabled Windows Media Player AutoUpdates
Menu bars and window frames opaque
Enabled slow-motion window effects
Added ‘Advanced System Properties’ in my Computer
Added Control Panel to my Computer
Faster browsing with IE
DEP execution is set to Default
Disabled the NTFS Last Access Time Stamp
Disabled kernel paging
Both 32 and 64 Bit Integrated
All Latest Drivers Integrated
7-zip for extraction purpose.
Adobe Flash Player plugin
Adobe Flash Player ActiveX
Orbit Downloader
Java Runtime Environment Update 17
ImgBurn
Added Group policy and Registry editor to control panel
Updated DirectX to August 2009
Mozilla Firefox 3.5
Low Memory consumption
Turned off system beeps
Stopped caching negative responses
Take Ownership, Device manager, Group policy, Registry Editor in the right click
Fully Automated setup you need to choose language and partition only.
Patched uxtheme files to use 3rd party themes.
Faster Shutdown ( 3 seconds services kill timeout.)
Fast Booting Time
Add Useraccounts 2 on ControlPanel.
PowerOff after shutdown
New High quality Icons
Changed command line text color to white
Set mouse pointer speed to maximum
Removed the annoying clicking sound
Disabled automatic restart in the event of a blue screen
Tweaked up shell response
Hibernation is Disabled.
Added ‘Advanced System Properties’ in my Computer
Added Control Panel to my Computer
Added Administrative Tools to my Computer
Added Internet Explorer to my Computer
Added Network Connections to my Computer
Added Search to my Computer
Added Printers to my Computer
Added Run and Windows Flip Switcher to my Computer
Removed warning about showing hidden system folders
Shutdown when you click power Button on start Menu
Maximum simultaneous downloads for IE to 20 ( default is 2 )
New look for Windows Media Center
New Explorer View
Allow renaming and removing of Recycle Bin
Makes a right click option for unknown files
Notepad saves window position
Opens 16-bit apps in a separate memory space. This increases stability when dealing with 16-bit apps.
Enabled Word wrap in Notepad
Enabled Status Bar in all windows
NVIDIA Drivers Added
New Themes
255 Sidebar Gadgets
Enabled search system folders in Search
System Files are boosted upto maximum Performance
Removed Old Default Graphics card drivers
Faster Application load Time
Improved the performance and reliability
Disabled the NTFS Last Access Time Stamp
Disabled kernel paging
Windows Update service disabled
Turned off system beeps
Stopped caching negative responses
Take Ownership, Device manager, Group policy, Registry Editor in the right click
Specifies the time, following user input, during which the system keeps apps from moving into the foreground.
No components removed
Windows 7 Ultimate Nvidia Edition Price

Windows 7 NVIDIA Edition 32 bit / x86 dan 64 bit / x64 ( 3,8 GB ) | Part 1 |Part 2 |
Windows 7 Ultimate Nvidia Edition 64 Bit Download
Selanjutnya - Windows 7 NVIDIA Edition
2 notes
·
View notes
Text
Iganga blind student scores 20pts in UACE exams.
Iganga blind student scores 20pts in UACE exams.
By Leonard Kamugisha Akida and Watera, IGANGA: Its an English adage that disabity is not inability and the UCE 2020 results have proved wrong anybody despising one of their physical or invisible disabilities that they in stead need a special care to explore and exploit their talents. Elaju Daniel, a blind student from Iganga district in Busoga region, is a talk of the country after UACE 2020…

View On WordPress
#Akantambira Shipra#Blind score 20 points#Bweranyangi#Elaju Daniel#iganga ss#Namwase Rinnah Marion#UACE 2020 results
2 notes
·
View notes
Text
Hey hey! Veetie’s TS2 is back in action! After much frustration, I hasten to add, because I was all the way up to FreeTime EP when I remembered that the UAC can throw hissy fits at that and later packs. Unable to disable UAC - twice - I installed the digital Ultimate Collection, which did all the work of reinstalling in a fraction of the time. Why didn’t I try this sooner? (That said, I now need to know where to install things like Clean UI, Radiance Lighting and CEPs...) Done! Yay!
As an aside, if anyone who can disable UAC is wanting to buy a full set of Sims 2 game disks... you know where to find me! haha ;)
2 notes
·
View notes
Text
Iso Windows 7 For Mac

Iso Windows 7 For Macbook Pro
Download Iso Image Windows 7 For Mac
Windows 7 Iso For Virtual Machine
Buy Windows 7 For Mac
And all my files got deleted so I decided to do a clean Windows 7 install. But unfortunately, at that time I was not having any copy of the Windows 7 DVD to install it. So I borrowed it from my friend and then install it on my Pc. After the installation is done, I copied all the windows installation files from that DVD so that I can use it later. Download Windows 10 Disc Image (ISO File) Before updating, please refer to the Windows release information status for known issues to confirm your device is not impacted. Download Windows 7 (SP1 included) for Mac free. Windows 7 (SP1 included) is an operating systems produced by Microsoft.
Duration: 2:01. How To Download A Windows 7 or 8.1 ISO On a Mac · 1. Go to. I have downloaded Wine, which allows me to do PC things on my Mac, but If you already own a Windows 7 physical copy, it is legal to download an ISO image.
Iso Windows 7 For Macbook Pro
Windows 7 on mac iso download - final, sorry
With: Windows 7 on mac iso download
MICROSOFT OFFICE CRACK DOWNLOAD WINDOWS 10Zip files turn into rar files well downloadingMAC FILE DOWNLOAD MANAGERMine craft story mode all episodes free pc downloadDOWNLOAD FNAF 1 PCPhp website where people can download filesDIDACHE CATHOLIC STUDY BIBLE FREE TORRENT DOWNLOADWii full iso download
How To Install Windows 7 (For Free!) On Your Mac
My Windows 7 desktop is spare, but just give me a few weeks. Microsoft hide caption
toggle caption Microsoft
If you went to your favorite pizza place and tried to order mushrooms and pepperoni and the waiter told you, 'I'm sorry but you can't order those two toppings together. You have to pick one or the other,' you'd be pretty mad, right?
Forgive the analogy, I just ate pizza.
The Mac versus PC debate has gotten so ridiculous that even normal, sane people who wouldn't care one way or another are now hurling insults and tsk-tsking at family members and co-workers who have either fallen into the fruity Mac OS camp or the stodgy Windows world.
You know what? (Expletive) all that. I say, have the best of both worlds.
Over the weekend, I installed Windows 7 RC, a free, preview version of Microsoft's forthcoming operating system, the successor to Windows Vista. Best of all, it works perfectly well on newer Macs sporting Intel processors. My Macbook, which is two years old, runs it like a champ as a Boot Camp partition. I never thought I'd say this about a Windows operating system again after refusing to upgrade from Windows XP, but from what I've seen so far, Windows 7 is... really good. Fast, pretty and without a single crash so far (knock on wood).
A step-by-step guide to installing Windows 7, after the jump.
Here's how to install it on your Mac in a few simple steps:
Make sure you have plenty of hard drive space, at least 40 or 50 gigabytes on your Mac. You're going to lose about 15-25, at least, to run Windows 7, so leave yourself plenty of space for Mac OS, too.
Go to this Microsoft page and sign up for the Windows 7 Release Candidate Customer Preview Program. It's a mouthful, but it works. Microsoft will send you a unique activation code you'll need later. Print it out or write that code down.
Download the 32-bit version of Windows 7. It's a big download, more than two gigabytes, so you'll be waiting a little while.
Burn the .iso file to a DVD to create a Windows 7 install disk. You can do this easily with OS X's Disk Utility. (More detailed instructions here).
Open up Boot Camp Utility. This will walk you through the process of creating a partition on your hard drive for Windows 7. Print out the manual if you want to (it does contain some good, useful info, but it's about 26 pages). Then use the DVD you burned to install Windows 7. Your machine will reboot several times as it installs.
You'll be asked, once Windows is installed, to enter your activation code.
You have Windows 7! As soon as you're in the Windows desktop, insert your Mac OS install disk (either the one that came with your Mac or a Leopard OS disk if you've upgraded) and install the Mac drivers that are on that disk. This will enable sound, your iSight camera and other hardware from your machine.
Don't like it? When you're back in OS X (see below), you can use Boot Camp Utility to delete the Windows partition and reclaim your hard drive space.
That's it. You have a working copy of Windows 7, which will continue to function normally until March 1, 2010.
If you want to switch back to OS X, you'll need to go into Control Panel and look for Boot Camp in order to tell the machine to restart in Mac mode. Once you're back in OS X, you'll have to do the same thing (in System Preferences) to go back to Windows 7. Software like Parallels and VMWare Fusion allows you to run Windows programs while in Mac OS, too. Both can run Windows 7.
Stuck on any steps? A more visual guide is available here.
Источник: (https://torrent-igruha.org/3551-portal.html)
Windows 7 on mac iso download - phrase
Windows 7 Mac Theme – Download for 32 bit and 64 bit
– Transform your windows 7 to Mac OS X Snow leopard and experience the Mac look and feel in windows! This Mac theme for windows 7 works on windows vista too and you can use it on both 32-bit and 64-bit windows OS.
Windows 7 has a huge collection of themes designed for it and you can alternate between the free windows 7 themes any day, any time! The Snow leopard pack is one such windows 7 theme to transform the entire windows 7 UI (user interface) and it includes the Snow Leopard Welcome Screen, Visual Style, Icons, Wallpapers, Sounds, Dock and much more.
How to install Mac Theme for Windows 7?
This pack includes the following third party applications.
RocketDock (with icon, iDock and Stacks Docklet)
Ubericon to render the icon effects
Virtuawin with snow leopard icons
Y’z shadow for shadow and transparency effects
Here is how you can get the Mac look and feel on windows 7.
After you download the snow leopard pack, extract the zip to a folder.Then right click and run the snow leopard transformation pack application as an administrator.The pack will require you to disable UAC, to work properly. If you choose “Yes”, it will disable UAC and prompt you to restart the computer.
After restarting, double click the snow transformation pack application icon to run it again. You will find the “Welcome” screen as shown below.
Click “Next” to continue.You will then be asked to accept the terms and conditions. After reading through them, you can choose to “Accept”. The installation will then continue. If you do find a screen that shows the remaining seconds as 10, don’t be fooled that it will complete soon, as the installation does take considerable time.
Download Iso Image Windows 7 For Mac
But it is worth waiting till completion, as it does a pretty decent job of transforming your Windows 7 to Mac!
If you do feel like uninstalling the Windows 7 Mac Theme, you can do it any time with a single click.
Windows 7 Iso For Virtual Machine
After uninstalling, make sure you enable UAC again. You can enable it by typing “UAC” in “Start” => “Search programs and files”, and then clicking “Change User Account Control Settings”. Then move the slider up, to set it as “Always Notify”.
Buy Windows 7 For Mac
Enjoy the Mac theme for Windows 7 and Vista. It gives a wonderful Mac experience on Windows 7 and Vista and is also easily removable. It is quite big in size (around 30 MB), but the storage that comes with computers these days is quite huge and this size shouldn’t be a problem. The only con is its requirement to disable UAC. Otherwise, it is quite cool.
Related Posts
1 note
·
View note
Photo


tolwyn03.wad: Spacious Depot of Decay MAP03 (3424, 144, 0) Author: Tolwyn (David Shaw) Date: 2010-01-19 Description: A Derelict supply depot, the UAC nearly abandoned this humble base months ago when it was discovered that the hellspawn were using it as a teleportation relay to mobilize to other locations throughout the galaxy. You must disable the depot by shutting down the power. This will mitigate further incursions in the immediate area.
5 notes
·
View notes
Text
How to disable User Account Control UAC
Issue In Windows Server and client OS machines, you are getting various permissions related prompts when launching applications or certain application features which require elevation are not working as expected. Solution Disable entirely or configure the User Account Control (UAC) feature of Windows. To disable UAC entirely, logon to the Windows machine(s) in question with a user which is a member of the local admins group. Run an elevated Powershell window and execute the following cmdlets: Set-ItemProperty -Path REGISTRY::HKEY_LOCAL_MACHINESoftwareMicrosoftWindowsCurrentVersionPoliciesSystem -Name EnableLUA -Value 0 -Force Set-ItemProperty -Path REGISTRY::HKEY_LOCAL_MACHINESoftwareMicrosoftWindowsCurrentVersionPoliciesSystem -Name ConsentPromptBehaviorAdmin -Value 0 -Force There are various registry settings such as the ones shown above in the Powershell cmdlets which control User Account Control (UAC). Full reference of all UAC related registry settings can be found at: https://docs.microsoft.com/en-us/windows/security/identity-protection/user-account-control/user-account-control-group-policy-and-registry-key-settings#registry-key-settings Alternatively you can use group policy to configure UAC settings. There are 10 Group Policy settings that can be configured for User Account Control (UAC). Read the full article
1 note
·
View note